Sorry I'm a little late with this week's polish pick, but better late than never, right?! Today I'm wearing Wet n Wild's bright red polish in 'Everybody Loves Redmond' and my ring finger is coated by e.l.f. Cosmetics 'Golden Goddess' which you'll recognize from a previous blog post. I love this red nail polish because it's bright, and is more of an orangey-red making it the perfect red for spring and summer. Red is a color that can be worn year round, but the shade of red is the key. For the warmer months, keep your reds bright for the perfect pop of color. I think topping off the red with a gold glitter nail polish is the perfect compliment for a little extra sparkle.
Follow me on Instagram and Twitter for more pictures. :)
Filling in your eyebrows is like the finishing touch to any face of makeup. No matter how little or how much makeup you are wearing, filling in the brows is a must in order to complete and pull the look together. By simply filling in the eyebrows, the entire appearance of the face can be changed. Tired eyes? Fill in your eyebrows for more awakened, opened eyes. A brow filler can be as magical as a facelift in makeup form. You won't necessarily need to go under the knife. If you're looking for a slight lift, fill in your brows concentrating more towards the top of the brow and arch area for an instant lift of the face.
If you're like me, my brows naturally grow uneven and no tweezing, waxing or any other form of hair removal can make them more alike. Now I know that brows should be sisters, not twins, but that doesn't mean I don't want them to be similar. Filling in my brows enables me to give them the appearance of being more alike. I also struggle from having a scar in the very center of my left brow causing the arch of my brows to be offset. Using a brow powder or pencil in this area alone evens them out tremendously!
Take a look at the before and after picture below.
Here are a few tips I have for anyone looking for the perfect brow products or how to fill in the brows.
1. NEVER use a black eyeliner to draw or fill in your eyebrows no matter your skin tone or hair color!
This is my number one pet peeve when it comes to brows. If your natural hair and skin color are darker, go for a dark brown. Black is too harsh and looks artificial, where a medium or dark brown will appear more natural. The whole point of filling in your brows is to make it look like YOUR eyebrows, not fake brows drawn on by a Sharpee.
2. If your hair color is lighter than your natural brow color, don't try to match your brow fill to the hair on your head. Natural blondes typically don't have bleach blonde eyebrows. Using a soft blonde or light taupe color will look more natural and soft.
3. Don't cake on the product. A little goes a LONG way. Simply dabbing your brush into the powder or wax will do for an entire brow. If you are applying a brow pencil, use soft, hair-like strokes. This will look more natural and keep from having the appearance of harsh lines.
4. If you have unruly brow hairs or a cowlick in your eyebrows, use a brow set or clear brow gel to keep your brow hairs in place. Another easy trick is to use a clear hair gel or hair spray on a spooly or toothbrush to comb in place. Works just as well!
5. When applying a brow powder or matte eyeshadow, use an angled brush with stiffer brush hairs. This will make it easier to create a more precise arch and line in your brows, especially if you like a lot of definition. This brush also works perfectly for applying a wax coat on top of your brow powder to set the powder and your brow hairs in place for a longer hold. The stiffer, more compacted brush hairs will hold up to the waxy products and will not be flimsy and wobbly.
And lastly,
6. Comb your brow hairs with a spooly to blend out the products and make it look more natural. Remember to comb in the direction of the hair growth.
Working at a brow bar for 2 years, I've definitely seen my fair share of hundreds of brows and lots of different types. These are some of my favorite tips and tricks for filling in the brows. If you have any questions or tips of your own I'd love to hear them! Let me know in the comments below. :)
The braided top knot is probably one of my favorite ways to wear my hair on my 'not so fab' hair days or when I'm running low on time. It's super quick and easy to do, but still elegant and classy, looking like you took the time to put yourself together in the morning even if you did wake up late.
What You Are Going To Need
Regular Comb
Teasing Comb (Optional)
Hairspray
Your Favorite Spray-on Shine
Bobby Pins
Elastic Hair Band
Tip: This works best on 'second day hair' because your hair has more texture and natural oils to keep the bun from falling out of place. Also, I have naturally curly hair, so I like to straighten my hair to give a more sleek look and show off the actual braid in my top knot.
Step 1: Comb hair into a high ponytail at the very top of your head. Try to bring it up as high as you can.
Step 2: Take the hair of your ponytail and separate it into three pieces and braid until you've reached the end of your ponytail. You can hold your braid in place by using a small rubber band.
Step 3: Holding from the end of the braid, twist the braid around the base of your ponytail until you've made a bun.
Step 4: Pin bun into place with your bobby pins. Once it's pinned into place you can loosen the braid by grabbing small pieces and pulling them outward to make your bun larger or add for a more messy look.
Step 5: Using your teasing comb, apply your spray on shine and smooth fly aways. Next, apply your favorite hairspray and repeat by smoothing out any remaining fly aways and comb upward for a more sleek look. Finish off by spraying once more all over and you're all finished! I like pulling a couple of pieces out to frame my face, but just do whatever you like and think looks best on you!
I hope you enjoyed this short tutorial! If you like these types of posts, let me know in the comments! I love hearing from my followers. :)
So, I recently purchased a pretty big order on eyeslipsface.com (which I haven't done in a LONG time) and with that I picked up three new polishes. I've always been a fan of the e.l.f. Cosmetics nail polishes, so seeing that they recently reformulated them and had a ton of new colors I decided to pick out three colors that I didn't already have in my nail polish collection.
The first color to catch my eye was the glitter polish in Golden Goddess. One trend I haven't quite tried or been a huge fan of until recently has been glitter nail polish, so this shall be my first!
I can't wait to show you what polish I pair it with in a future POTW!
The second polish I just HAD to have was not new, but new to me; the perfect nude polish in the color Innocent. I've seen reviews on this polish and it's really similar to the Essie polish in the color Sand Tropez that I've been eye-ing for quite some time, so this was a must try. Which I'm currently wearing and LOVING! Pictures coming soon! Can you guess what this week's Polish Pick is going to be? ;) (wink wink)
Lastly, I was really excited to try this bubblegum pink color in Gum Pink. Now don't get me wrong, it's a gorgeous color, but it dries a lot darker than I was hoping, especially after two coats. So unfortunately, this was a miss rather than a hit for me. I already have two colors very similar, including the Essie polish in Mod Square which you can find swatches of in my first spring Polish Pick of the Week post.
As far as reformulation goes with these polishes, to be honest I don't really see a whole lot of difference, but what do you think?
What are some of your guys' opinions on these polishes?
Have you seen a new and improved formula when you've tried out these e.l.f. polishes?
Which color is your favorite out of these three?
Share! I love reading your comments!
Have a wonderful and positive, fun-filled day friends!
Check out the swatches below!
Also, let me know if you'd be interested in a haul showing you what else I picked up from eyeslipsface.com!
I recently purchased this dress from Target for just under 20 dollars and I've been obsessed with wearing it during these warm spring days. It's lightweight, comfortable, and not to mention really cute!
I love the bright watermelon color paired with the turquoise and peach colored flowers and white polka dot detailing covering the dress. Buttons go up along the center of the bust and originally it was belted by a rope braided, pink and white belt. I decided to pair it with a brown, braided leather belt and a lightweight blue, boyfriend sweater, topping everything off with my bright yellow and brown sandals featured below in my Spring Favorites! You can dress this outfit up with a pair of nude wedges or pumps and a blazer or keep it casual like I did here. :)
My favorite mint nail polish hands down is this E.L.F. Cosmetics nail polish in Mint Cream. Not only is it the perfect mint color, the price point is amazing! $2.00!! I just ordered some new polishes from them this week. Can't wait to share them with you! Try this polish out and if you do let me know how you like it!
(Left-Right) Sinful Colors in Innocent, China Glaze neon polish in Pink Voltage, Wet and Wild bright coral in Blazed, E.L.F. Cosmetics in Lilac and Mint Cream.
You'll be seeing swatches in upcoming POTW!
Nivea Sun Kissed Beautiful Legs for Medium-Dark Skin Tones.
Legs need a tan or a glow, but the sun's been hiding? This will do just the trick! I even use this on my arms and decollate to get a jump start on my summer tan without the harmful UV rays.
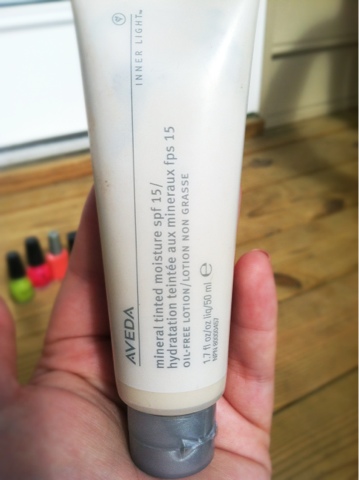
Aveda Inner Light Mineral Tinted Moisture SPF 15
During the warmer months, I like to use a tinted moisturizer when I'm not wearing foundation to ensure my skin gets the protection it needs from the sun. This is in the color 'Sheer' and it adds a nice dewy glow to the skin after it is applied. You can also pick this up in a color closer to your skin tone to allow for more coverage. I prefer sheer so that I have the option of mixing this in with my current foundation for more coverage and a perfect match to my complexion or just going al naturale!
Yellow, Montego Bay Club Sandals from Payless
Looking for the perfect sandals that are trendy on a budget? Check out these adorable yellow sandals I picked up on sale at Payless for only $9! They're super comfortable and add just the right pop of color to brighten up any spring wardrobe. Don't you just love? I'm obsessed!
What are some of your current favorites for spring? Share them in the comments below! I can't wait to hear. :)
It's that time again! Polish Pick #3 is Sinful Colors in Soulmate.
This polish is a peachy pink and is extremely opaque. It dries matte, so if you prefer matte polishes then you can't beat this polish for the price. And if you need a glossy finish, apply a shiny top coat for perfection! I picked this polish up at my local Walgreens for $1.99. I applied two coats of polish and then topped it off with my Nail-Aid 3 Minute Artificials Top Coat, which you can read my review on below. :)
This top coat claims to to give you natural nails equivalent to the strength of acrylic nails in 3 minutes. If you're looking to this product to do the job it actually claims, then you're going to be disappointed with the outcome. I purchased this top coat because I was obsessed with the outcome of getting gel nail polish done at the nail salon, but I was definitely not obsessed with the price. So in hopes of finding something to take the place with a much better price point that I could do myself at home, I picked this product up for about 5 dollars. I followed the directions carefully the first time, applying no polish in order to see how strong it would actually make my nails, I was disappointed to find that it didn't really show much of a difference. Naturally my nails are pretty strong, so this could be why I didn't see a result. The second time using a polish though, I found this top coat to really provide the staying power I needed for my polish. Using this as my base and top coat, my polish lasts at least 4 or 5 days without an ounce of chipping! I'm so used to my nails lasting about 2 days before they start chipping that 5 days seemed impossible. I'm loving this as my new top coat right now. Have any of you tried this product out? I'd love to hear what you have to share!
I haven't been feeling well for the past couple days and a nice and relaxing, hot bubble bath was just what I needed to feel better. So I rummaged through my Bath and Body Works stash and found my Sleep body wash and foam from the aromatherapy line in vanilla cinnamon. Pour a little of this into your tub filled with hot water and the aroma alone will relax you. The sweet smell is to die for and the best part is that your skin smells delicious afterwards. I'm in love with the aromatherapy line at Bath and Body Works. A couple of my other favorites are the Vanilla Verbana and Eucalyptus Spearmint. What are some of your favorites? Or tips you have for the best bubble bath. Share them. I would love to hear! :)
I'm pretty sure if you ask any girl what's in her top 5 beauty must haves list, mascara would be close to the top. Not just any ole mascara though. It has to do the job right; Add lots of volume and elongate the lashes without clumping and flaking on the clock. A good mascara can make all the difference in the world when it comes to a face of makeup, and a bad mascara can definitely ruin a look just as easily. I'm constantly trying out new mascaras and my current fav is the Maybelline New York, The Colossal Volum' Express in Class Black- Waterproof. I like how this mascara gives me just the right amount of volume and length, making my eyes pop without making it look like my lashes are fake. Personally I like more natural looking lashes, although I do like my lashes to still stand out just enough to brighten and open up my eyes. I love the fact that I can layer this mascara up to 3 or 4 times without getting clumps and throughout the day I don't seem to have any issues with flaking. I have very sensitive eyes, so some mascaras can cause itching close to my lash line. I have yet to experience any issues with sensitivity with this mascara. It is waterproof so it is very long lasting. It lasts me all day until I remove it at night during my skin care regiment. You will need an eye makeup remover that removes waterproof makeup. If you're looking for a mascara that can do all of the things I've mentioned then you should definitely try this out. Even if you're a false lashes wearer, pop this on top and your eyes will look fantastic! In my opinion, you can spend tons of money on expensive mascaras like Benefit They're Real and Lancome Hypnose, or you can try out this mascara which does an awesome job at an even more awesome price point! I believe I bought this for about 7 bucks at the drug store. Mascaras dry out so quickly and are used up so frequently that I just prefer drugstore over more high end brands. If you try it out, let me know what you think!
Follow if you enjoy beauty blogs and check me out on Twitter! @jessicar009
Also, follow the link to my husband's fitness blog if you enjoy all things fitness! Mind4Fitness
I don't care if you're 21 or 41, as women (and men) we are all concerned with keeping ourselves looking youthful for as long as possible. Preventative measures people!! I'm sure we all have our share of anti-aging creams and serums. Where does it all start? With your eyes! Eye creams are one of the most popular anti-aging products. Why? Because no one wants to end up with crows feet. Obviously!!!
If you're 41 I'm sure you already have an eye cream incorporated into your skincare regime by now...if you don't then shame on you! And if you're 21, don't you think it's time to start?? You may not have many wrinkles now, but the sooner you start your preventative measures the better off you'll be in the long run! Not to mention you need something to take care of those puffy, dark circles as a result from staying out all night or up all night working on those papers. Finding an eye cream that will do both of those things is key!
I won't lie, I'm no where near wrinkle road right now...but I do deal with dark circles and puffiness on a pretty frequent basis. I'm concerned with anti-aging as well as treating my dark circles. That is why my all time favorite eye cream would have to be the Aveda Green Science Firming Eye Cream. This baby is a miracle worker! It's smooth an creamy and leaves the skin around my eyes feeling super soft! My favorite part is that unlike many eye creams, it's gentle enough to be used all over the eye lid as well. The texture is very smooth and a little bit of product goes a long way. Some of the main ingredients listed are lady thistle, organic argan oil and cactus formula. These ingredients bring in the most moisture that is needed in order to plump up the skin and smooth out wrinkles. Dry skin = More Wrinkles; So, an eye cream that is extremely moisturizing is key to diminishing fine lines and wrinkles and preventing new ones. Another key ingredient found in this eye cream is plant-derived buckwheat wax, which aids in minimizing the appearance of fine lines as well. Below you'll see pictures of the product in packaging and an example of about how much product you need per eye.
A tip for applying your eye cream; Always use your ring finger and softly pat the cream around the eye, the brow bone and on the eye lid gently if your eye cream is safe to use on the lid.
Thanks for taking time out of your day to visit my blog! If you're interested check out my life blog: My Life With Charles In Charge
Hey guys! Here's my polish pick for this week. The past couple days been kind of chilly so cold weather clothes have been pulled back out and with that I decided to match my polish by choosing OPI's French Quarter For Your Thoughts. I think a grey polish can be versatile for any season. Darken your look by pairing it with navy blues and blacks or brighten it up by pairing it with pinks, yellows or even a mint green! Hope you like!! Xoxo